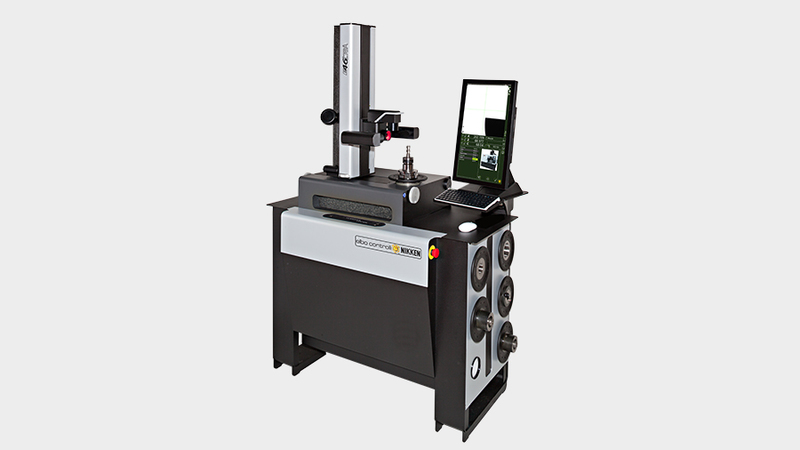
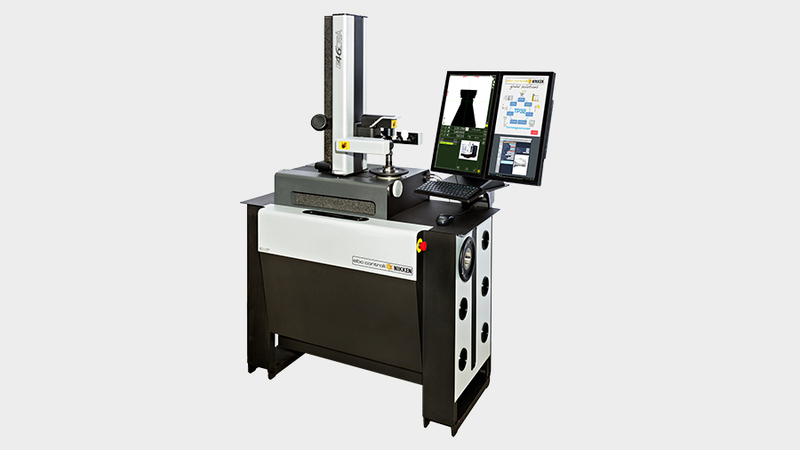
The newly developed auto-measure function on the E46LTWA Presetter introduces a feature that is unique on this type of machine.
When “auto-measure” is performed, the spindle rotates at a speed that is calculated based on the peripheral diameter of the tool to ensure the cutting edge is captured with the highest level of accuracy.
E46LTWA is equipped with the original camera as on the E46LA model but with the addition of a secondary high-resolution swivel camera (60X magnification with, in addition, 2X and 4X digital zoom capability) to allow and facilitate detailed inspection and geometry functions from both the side and top of the tool profile. This additional capability is particularly useful not only for CNC machinists but also benefits tool manufacturers to precisely measure linear and geometrical features of the tool profile.
In addition to this, as the highest point of each individual cutting edge is approached, the software calculates the deceleration and acceleration of the spindle to ensure absolutely precise measurement of each and every cutting edge is achieved. This is unlike other machines in the marketplace that use one constant rotational speed based on a set tool diameter, by instead linking the auto-measure function of the Presetter to the diameter of the tool being measured.
-

Machine structure in high quality structural steel to provide increased stiffness with higher accuracy and rigidity.
-

Featuring an automatic measure function with a 22” capacitive touch screen.
-

Solid granite column and base to guarantee maximum accuracy.
Main Frame & Construction
Machine structure in high quality structural steel to provide increased stiffness with higher accuracy and rigidity. Solid granite column and base (increased substantially in size over previous generation models) to guarantee maximum accuracy.
Spindle System
A wide variety of tools can be pre-set utilizing interchangeable spindle cartridges rather than adaptors. This reduces the number of interface connections delivering accuracy across all spindle types.
Functionality
Featuring an automatic measure function with a 22” capacitive touch screen. The screen layout is split into two sections, half displaying images of the current tool and profile, and the other allowing access to the existing software functions.


E46LTWA IS Tool Presetting Machine
E46LTWA Tool Presetter
(PDF - 222 KB)
TECHNICAL DATA
Measuring range: Diameter max 320 mm (radius 160 mm); height max 600 mm.
Motor providing automatic rotation of the spindle with pneumatic engagement of the motion transmission providing zero backlash (patented system).
C Axis display for both spindle body and spindle-holder.
Standard mechanical/electronic and optical equipment:
- Base and column made of natural granite to guarantee the maximum accuracy: linearity max error 2 μm/Mt – certification with Taylor Hobson res.1 μm/Mt. electronic millesimal level.
- ELBO CONTROLLI NIKKEN Linear Transducers in optical glass type AS 371 certified HP laser: Axes resolution: X= 1 μm, Z= 1 μm.
- Machine structure in stainless steel offering high mechanical strength and long life, floor mounted with 3 fixed supports and one adjustable support in steel.
- ISO / BT / HSK / VDI... etc. Interchangeable rotating spindle-holder (to be specified) max run-out error < 2 μm
- Spindle Index in four angular positions: 0°-90°-180°-270°.
- Spindle-holder Identification System (SP-ID) with NFC technology to automatically identify the spindle-holder after each replacement.
- Linear slideways: 2 for X axis slideways and 1 for Z axis slideway.
- Double re-circulating ball bearing slides (four in total), lubricated for life. Universal electro-mechanical tool clamping (ISO only).
- Pneumatic-mechanical braking of the spindle-holder rotation with radial compensation of the clamping force – no axis angular run error.
- Constant load Archimedean spiral spring (as opposed to a mass counter-balance system).
Main Camera:
- Bi-telecentric lens.
- Optical doublets at low F/Number in order to eliminate the error of the clearness circle. Magnification 26X, digital zoom 2x and 4x available.
- C-MOS sensor 1.3 mega pixels, USB 2.0 high speed connection.
- Framed image area 10 x 10 mm (3 times larger than standard values).
- Episcopic illuminator with ring lens and red LED’s. Diascopic illuminator with puntiform red light.
Second/Third Cameras:
- Bi-telecentric lens.
- Opportunity to view the tool from the top (front) of from the side (flank).
- The twin camera design allows it to be retracted through 90 degrees to remove it from above the tool so as not to obstruct normal measuring processes.
- Magnification 60X, digital zoom 2x and 4x available.
- C-MOS sensor 1.3 mega pixels, USB 2.0 high speed connection.
- Framed image area 4 x 4 mm (3.9 μm/pixel).
- Illuminator: episcopic ring with diffused light and low angle reducing the possible glare caused by characteristics of the tool surfaces/materials.
Machine operator interface through:
- Full HD LCD 22” colour Touch Screen monitor.
- Intel I3 Quad Core Processor.
- UBUNTU LINUX 14.04 LTS operating system.
- Data storage on solid state disk SSD.
- X and Z axes lock management for a translation speed lower than 2 mm/sec.
- Four USB ports
- One LAN networking port and wireless connection (Wi-Fi 802.11 150Mb/s).
Standard software:
- Operator-machine interface simple and intuitive by single screen function (based on ISO7000). Ease of use thanks to the integrated touchscreen.
- CNC machine origin and spindle adaptor management.
- Tool list creation and/or single tool. Also possibility to create a customized format. Theoretical measurement and tolerance management.
- Tool set and Post Processor universal generator.
- Automatic change of CNC machine origin allocation.
- Printable tool set report.
- Spindle holder auto rotation with automatic tool measurement cycles for single cutter or multi-edged cutters. DXF format drawings import capability for overlaying a drawing on a live tool profile.
- Tool profile acquisition exportable in DXF format.
- Ready for TiD infrastructure for tool identification and data transfer using a data matrix tag/code.
- Ready for Magnetic chip code-holders (Balluff for example, hardware not included and available as option). Anti-dust cover provided for when not in use.
Overall dimensions: Length = 1282 mm, Height = 1874 mm, Depth = 672 mm. Net weight: 270 Kg.
| E46LTWA | |
|---|---|
| X Axis Measure (Diameter) | 320 |
| Z Axis Measure (Length) | 600 |
| Natural Granite Base & Column | ✓ |
| Interchangeable Spindle Cartridge | ✓ |
| C Axis Display Spindle Body and Spindle Cartridge | ✓ |
| Interchangeable Spindle Max. Run-Out Error | 2µm |
| Automatic Rotation of the Spindle | ✓ |
| Spindle Index in four Angular Positions (0º, -90º, -180º, -270º) | ✓ |
| Spindle Rotation Brake | Pneumatic |
| Spindle Identification System (NFC recognition) | ✓ |
| Clamping System | ✓ |
| Tool Inspection Function/Capability | ✓ |
| Elbo Controlli NIKKEN Triple Camera System (Cutting Edge Inspection) | ✓ |
| Main Camera System Resolution | 1µm |
| Main Camera System Measuring Range (C-MOS Sensor Framed Image Area) | 10mm x 10mm |
| Secondary 'Twin' Camera System Measuring Ranges (Framed Image Area) | 4mm x 4mm |
| Main Camera Magnification | 26x |
| Secondary 'Twin' Camera System Magnifications | 60x |
| Elbo Controlli NIKKEN Certified Optical Scale Axes Resolution | 1µm |
| Elbo Controlli NIKKEN GS371 Certified 'Natural Granite' Optical Scale Axes Resolution | ✗ |
| Touch Screen System (Operator Interface) | TFT 22" HD Portrait |
| Keyboard and Mouse | ✓ |
| Electronics/Processor | Intel i3 Quad Core Processor |
| Firmware/Operating System | Ubuntu Linux LTS |
| Data Storage | SSD |
| Elbo Controlli NIKKEN Tool Management Software | E46L software |
| Tool Set Management and Post Processor Universal Generation | ✓ |
| DXF File Import and Creation | ✓ |
| Balluff Read/Write Ready (Balluff Hardware Required)? | ✓ |
| Elbo Controlli NIKKEN TiD Ready? | ✓ |
| Elbo Controlli NIKKEN TP32 Ready? | ✓ |
| Elbo Controlli NIKKEN IS 'Integrated Solution' with Twin Screen and Dual OS Option Ready? | ✓ |
